
VBA Blogs: Create text file from Excel table
5 July 2019
Welcome back to the VBA blog! This week we are going to expand on our blog from last week, relating to file path selectors.
Today, we are going to create a VBA script that will create a text file based on a specific table in the Excel workbook. This is useful to create text templates for a range of purposes, such as uploading data into databases and other systems that only accept text files.
We would like to save the following table (Table1) in Excel:
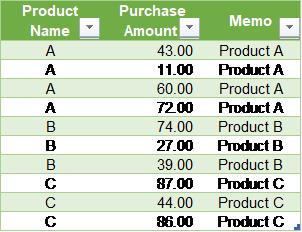
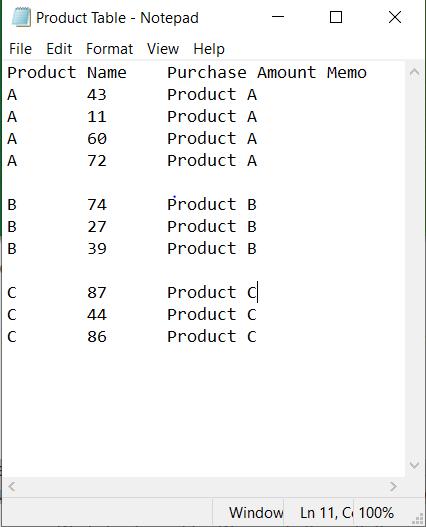
to a text file as below. More specifically, we want to generate a text file with the same content as listed in the Excel table above and insert blank rows between lines with different descriptions in Memo column. Also. We want to keep the structure of the Excel table unchanged:
The first step involves declaring relevant variables.
Dim filename As String, lineText As String
Dim myrng As Range
Dim i, j
Then, we define the file path in the local drive where we want the text file to be saved. The code “ThisWorkbook.path” defines the file path for the current workbook and we use this file path as the root directory for the text file. The code “Worksheets("Product Table").Name” defines the name of the text file to be saved.
filename = ThisWorkbook.path & "\" & Worksheets("Product Table").Name & ".txt"
The next line of code sets up the output file and gives a file number for the output file. The file number allows us to distinguish between the different output files if we have more than one output text file.
Open filename For Output As #1
Then, we assign the target table (Table1) range to the pre-defined variable myrng and we will use this variable later on in the code.
Set myrng = Range("Table1")
The next several lines of code loops through the rows and columns of the table by using a For Loop. We’ve covered the For loop before in a previous blog, you can read about it here.
For i = 1 To myrng.Rows.Count + 1
For j = 1 To myrng.Columns.Count
Next j
Next
The line of code below is then inserted into the loop where we write the content of each row in Table1 to the text file. The code “IIf(j = 1, "", lineText & Chr(9))” defines that if j = 1, then print blank to ignore the content in the first column. If not, we use the combined context of “lineText” and Chr(9) which is equivalent to Horizontal Tab defined in ASCII codes. Chr(9) is used as the Tab delimited for the text file. The next code “myrng.Cells(i - 1, j)” finds the content of the previous row in the data table and then is concatenated to context defined before. Then the new concatenated context is assigned to the variable “lineText” which adds up the content of each column in the data table.
lineText = IIf(j = 1, "", lineText & Chr(9)) & myrng.Cells(i - 1, j)
After defining the content to be printed in the text file, we print out the content by using “Print” syntax. The code below inserts the content of “lineText” into the target text file line by line. Print # statement writes display-formatted data to a sequential file. The first parameter is mandatory and any valid file number could be applied. The next parameter is outputlist which is lineText in our case, it defines the expression to be printed. To view more details about “Print #” statement, please go to here.
Print #1, lineText
In order to create the blank line between the two records with different memo descriptions, we have to write additional code. The code below identifies the contents in the third column of the data table. Firstly, we define the criteria “i > 2”, this is used to exclude the header row because we don’t want to insert a blank row between the header and the first row of the data table. If the content of the current row of data table at the third column is different from the content of the next row, a blank line is inserted. If not, then do nothing.
If i > 2 And Cells(i, 3).Value <> Cells(i + 1, 3) Then
lineText = ""
Print #1, lineText
Else
'Do Nothing
End If
Next, we end the loop and close the text file which is defined as output #1:
Close #1
Combining all the lines of code together, we get this:
Sub SaveAsTxtFile()
Dim filename As String, lineText As String
Dim myrng As Range
Dim i, j
filename = ThisWorkbook.path & "\" & Worksheets("Product Table").Name & ".txt"
Open filename For Output As #1
Set myrng = Range("Table1")
For i = 1 To myrng.Rows.Count + 1
For j = 1 To myrng.Columns.Count
lineText = IIf(j = 1, "", lineText & Chr(9)) & myrng.Cells(i - 1, j)
Next j
Print #1, lineText
If i > 2 And Cells(i, 3).Value <> Cells(i + 1, 3) Then
lineText = ""
Print #1, lineText
Else
'Do Nothing
End If
Next i
Close #1
End Sub
This way, we can create the required text file from the target table without changing the structure in the Excel file.
See you next week for more VBA tips!